Spring基本知识
- 最近用到一些Spring的特性,发现好多知识点忘了,决定再重温一遍。

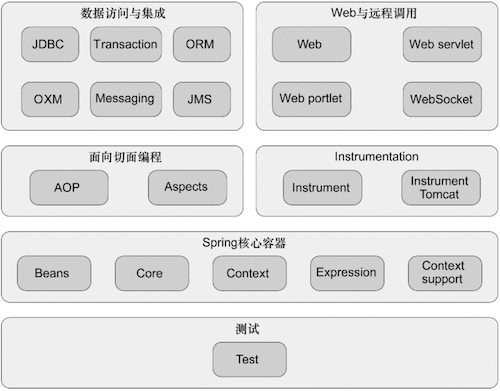
- Spring框架由6个定义明确的模块组成
- Spring核心容器
- 是Spring最核心的部分,负责Spring应用中的Bean的创建、配置和管理在该模块中Spring的Bean工程提供了依赖注入。除了Bean工厂和应用上下文,该模块也提供了很多服务,比如:邮件、JNDI访问、EJB集成和调度。
- Spring的AOP模块
- 在该模块中Spring对面向切面提供了丰富的支持,该模块也是Spring应用系统开发切面的基础。
- 数据集成与访问 -Spring的DAO和JDBC封装了不少模板代码,可使数据库操作代码简单明了还可避免数据库资源泄露等问题。
- Spring提供了ORM模块,Spring没有尝试去创建自己的ORM解决方案,而是对许多流行的ORM模块进行了集成,包括Hibernate、Java Persisterncs API(JPA)、JDO\iBatis。
- 本模块也包含了JMS之上构建的Spring抽象层,使消息以异步的方式和其他应用集成。本模块还包含了对象映射到XML的特性,他最初是Spring Web Service项目的一部分。
- 除此之外本模块使用了Spring AOP为Spring应用中的对象提供事务管理服务。
- Web和远程调用多种流行的MVC
- Spring集成了多种流行的MVC框架,但他的Web模块和远程调用模块自带了一个强大的MVC框架,有助于提升Web应用层技术的松耦合。
- Spring远程调用服务集成了RMI、Hessian、Burlap、JAX-WS,同时Spring还自带了一个远程调用框架:HTTP invoker。
- Instrumentation模块
- Instrumentation模块提供了为JVM添加代理(agent)的功能。具体来讲,它为Tomcat提供了一个织入代理,能够为Tomcat传递类文件,就像这些文件是被类加载器加载的一样。
- 测试
- 该模块为JNDI、Servlet和portlet编写单元测试提供了一系列的模拟对象的实现。
Spring bean注入知识
注入bean的两种方式
- 构造器注入
    <bean id="weixinUtil" class="com.air.tqb.utils.weixin.WeixinUtil">
        <constructor-arg name="interfaceUrlPrefix" value="${wxb.interface.url}">
        <constructor-arg name="configuration" ref="wxbConfiguration">
    </bean>
- setter方法注入
    <bean id="weixinUtil" class="com.air.tqb.utils.weixin.WeixinUtil">
        <property name="interfaceUrlPrefix" value="${wxb.interface.url}"/>
        <property name="configuration" ref="wxbConfiguration"/>
    </bean>
所有的Spring bean默认都是单列,如果需要每次获取bean都是新产生或者是唯一的话可以使用scope=prototype例如:
    <bean id="weixinUtil" class="com.air.tqb.utils.weixin.WeixinUtil" scope="prototype">
        <property name="interfaceUrlPrefix" value="${wxb.interface.url}"/>
        <property name="configuration" ref="wxbConfiguration"/>
    </bean>
注入内部bean
- 如果有些bean是专用,不想和外界共享,此时可以注入内部bean,内部bean的最大缺点就是:不能被复用,仅适用于一次注入
    <bean id="weixinUtil" class="com.air.tqb.utils.weixin.WeixinUtil" scope="prototype">
        <property name="interfaceUrlPrefix" value="${wxb.interface.url}"/>
        <property name="configuration">
            <bean class="com.air.tqb.utils.weixin.TestInnerBean"/>
        </property>
    </bean>
使用p标签简化<property>
    <bean id="weixinUtil" class="com.air.tqb.utils.weixin.WeixinUtil"
        p:interfaceUrlPrefix="${wxb.interface.url}"
        p:configuration-ref="wxbConfiguration"/>
装配集合
-
如果对象字段使用的是Collections对象,那么种情况下List,Set,Map用法类似
- 装配List
<bean id="weixinUtil" class="com.air.tqb.utils.weixin.WeixinUtil" scope="prototype"> <property name="interfaceUrlPrefix" value="${wxb.interface.url}"/> <property name="configurations"> <list> <ref bean="test1"> <ref bean="test2"> <ref bean="test3"> </list> </property> </bean>- 装配Map
<bean id="weixinUtil" class="com.air.tqb.utils.weixin.WeixinUtil" scope="prototype"> <property name="interfaceUrlPrefix" value="${wxb.interface.url}"/> <property name="configurations"> <map> <entry key="TEST1" value-ref="test1"/> <entry key="TEST2" value-ref="test2"/> <entry key="TEST3" value-ref="test3"/> </map> </property> </bean>- entry属性
key:map中的key为String ket-ref:map中的key为Spring上下文中其他bean的引用 value:map中的key为String value-ref:map中的key为Spring上下文中其他bean的引用- 装配Properties集合
- 如果key和value都是String类型,方式一可以使用Map进行装配,方式二也可使用
java.util.Properties进行装配
  <bean id="weixinUtil" class="com.air.tqb.utils.weixin.WeixinUtil" scope="prototype">
      <property name="interfaceUrlPrefix" value="${wxb.interface.url}"/>
      <property name="configurations">
          <props>
              <prop key="TEST1">test1</prop>
              <prop key="TEST2">test2</prop>
              <prop key="TEST3">test3</prop>
          </map>
      </props>
  </bean>
 5. 装配空值

  ```xml
  <property name="interfaceUrlPrefix"><null/></property>
- 使用SpEL表达式装配bean
- 装配字面值
<property name="message" value="This value is #{5}"/>
- 引用Bean、Properties和方法,这里使用SpEL把一个ID为
saxophone的bean装配到instrument属性中
  <!--一般引用bean的方法-->
  <property name="instrument" ref="saxophone"/>
  <!--使用SpEL表达式引用-->
  <property name="instrument" value="#{saxophone}"/>
- 使用SpEL引用Bean中的属性
  <bean id="zhanga" class="com.zealzhang.Test123">
      <property name="song" value="#{kenny.song}"/>
  </bean>
- 通过bean方法返回值装配其他bean的属性
  <property name="song" value="#{songSelector.selectSong()}">
  <!--避免抛出空指针-->
  <property name="song" value="#{songSelector.selectSong()?.toUpperCase()}">
  <!--这里的?运算符会确保左边的值不null-->
- 操作类,有很多情况需要访问类的静态变量,在SpEL中可使用
T()来访问
    <property name="multiplier" value="#{T(java.lang.Matn).PI}">
    <!--得到0-1之间的一个随机数-->
    <property name="randomNumber" value="#{T(java.lang.Matn).random()}">
- SpEL的其他用法 1. 算术运算:加、减、乘、除、取余、幂运算 2. 关系运算:<、>、==、<=、>=、lt、gt、eq、le、ge 3. 逻辑运算:and、or、not、| 4. 条件运算:?:、?: 5. 正则表达式
  <!--一个条件运算的例子-->
  <property name="song" value="#{songSelector.selectSong() != null ?       songSelector.selectSong() : 'other'}">
  <!--和上面的例子等价-->
  <property name="song" value="#{songSelector.selectSong()?: 'other'}">
- SpEL也可以筛选集合、访问集合成员、投影集合等
最小化Spring XML配置
自动装配Bean属性
- 4种类型的自动装配
- byName:把与bean的属性具有相同的名称的bean自动装配到bean对应的属性中
       <!--正常装配-->
       <bean id="saxophone" class="com.air.tqb.aop.MyInstrument"/>

       <bean id="zhanga" class="com.zealzhang.Test123">
           <property name="song" value="#{kenny.song}"/>
           <property name="instrument" ref="saxophone"/>
       </bean>

       <!--自动装配-->
       <bean id="instrument" class="com.air.tqb.aop.MyInstrument"/>
       <bean id="zhanga" class="com.zealzhang.Test123" autowire="byName">
           <property name="song" value="#{kenny.song}"/>
       </bean>
- byType自动装配:把与bean属性具有相同类型的的其他bean装配到bean的属性中
- byType自动装配存在一个局限性,如果Spring找到多个bean匹配,Spring不会猜测哪个Bean最适合装配,而是选择抛出异常。
- 为避免因为使用byType自动装配带来的歧义,Spring提供了另外两种选择:①可以为自动装配标识一个首选Bean;②可以取消某个Bean自动装配候选资格;
- 可使用bean的
primary属性设置true标识为首选Bean,primary默认为true,因此要设为非首选Bean需要显示设置primary="false"
<bean id="saxophone" primary="false" class="com.air.tqb.aop.MyInstrument"/>
- 在自动装配时我们希望排除某些Bean可设置`autowire-candidate="false"`

```xml
  <bean id="saxophone" autowire-candidate="false"  class="com.air.tqb.aop.MyInstrument"/>
```
-
constructor自动装配:把与Bean的构造器入参相同的类型的掐Bean自动装配到Bean构造器的对应的入参中。
- constructor自动装配与byType自动装配有着相同的局限性当发现多个Bean匹配某个构造器的入参时Spring不会猜测哪个Bean更适合自动装配
<bean id="saxophone" autowire="constructor" class="com.air.tqb.aop.MyInstrument"/> -
autodetect装配:首先使用constructor自动装配。如果失败再次尝试byType自动装配
<bean id="saxophone" autowire="autodetect" class="com.air.tqb.aop.MyInstrument"/>
- 默认自动装配
- 我们所需要做的仅仅是在根元素
增加一个 default-autowire="byType"
     <?xml version="1.0" encoding="UTF-8" ?>
     <beans xmlns:xsi="http://www.w3.org/2001/XMLSchema-instance"
     xmlns:p="http://www.springframework.org/schema/p" xmlns:context="http://www.springframework.org/schema/context"
     xmlns:aop="http://www.springframework.org/schema/aop"
     xmlns:tx="http://www.springframework.org/schema/tx" xmlns="http://www.springframework.org/schema/beans"
     xsi:schemaLocation="http://www.springframework.org/schema/beans
     http://www.springframework.org/schema/beans/spring-beans-3.0.xsd
     http://www.springframework.org/schema/context
     http://www.springframework.org/schema/context/spring-context-3.0.xsd
     http://www.springframework.org/schema/tx
     http://www.springframework.org/schema/tx/spring-tx-3.0.xsd
     http://www.springframework.org/schema/aop
     http://www.springframework.org/schema/aop/spring-aop-3.0.xsd"
     default-autowire="byType">
      </beans>
- 默认情况下
default-autowire="none"
- 混合使用自动装配和显示装配
- 对某个Bean选择了自动装配的同时也能显示的使用
<property>装配想要装配的属性,这种情况显示装配优先级较高。
    <bean id="saxophone" class="com.air.tqb.aop.MyInstrument"/>
    <bean id="zhanga" class="com.zealzhang.Test123" autowire="byName">
         <property name="song" value="#{kenny.song}"/>
         <property name="instrument" ref="saxophone"/>
    </bean>
- 使用注解装配
- 使用注解装配与在XML中使用autowire属性装配并没有太大区别
- Spring容器默认是禁止注解装配的,我们需要显示的在xml中启用它,配置Spring的context命名空间
<context:annotation-config>,,最简单的启用方式如下:
    <?xml version="1.0" encoding="UTF-8" ?>
    <beans xmlns:xsi="http://www.w3.org/2001/XMLSchema-instance"
        xmlns:p="http://www.springframework.org/schema/p" xmlns:context="http://www.springframework.org/schema/context"
        xmlns:aop="http://www.springframework.org/schema/aop"
        xmlns:tx="http://www.springframework.org/schema/tx" xmlns="http://www.springframework.org/schema/beans"
          xsi:schemaLocation="http://www.springframework.org/schema/beans
        http://www.springframework.org/schema/beans/spring-beans-3.0.xsd
        http://www.springframework.org/schema/context
        http://www.springframework.org/schema/context/spring-context-3.0.xsd
        http://www.springframework.org/schema/tx
        http://www.springframework.org/schema/tx/spring-tx-3.0.xsd
        http://www.springframework.org/schema/aop
        http://www.springframework.org/schema/aop/spring-aop-3.0.xsd">
        <context:annotation-config/>
  </beans>
- 使用@Autowired装配
- 假设我们需要使用@Autowired让Spring自动装配Instrumentalist的instrument属性,则可对
setInstrument()方法进行标注
      //当Spring发现我们对setInstrument使用@Autowired注解时Spring就会对该方法执行byType自动装配
      @Autowired
      public void setInstrument(Instrument instrument) {
          this.instrument = instrument;
      }
@Autowired有趣的地方在于他不仅能装配setter方法,还可标注需要自动装配Bean引用的任意方法:
    @Autowired
    public void hereYoueInstrument(Instrument instrument) {
    this.instrument = instrument;
    }
@Autowired注解甚至可以注解构造器
      @Autowired
      public Instrumentalist(Instrument instrument) {
          this.instrument = instrument;
      }
@Autowired可直接标注属性甚至不会受限于private关键词,并删除setter方法,也是我们最常见的装配方法
      @Autowired
      private Instrument instrument;
-
使用
@Autowired自动装配时,需要注意以下两种情况- 没有匹配的Bean
- 存在多个匹配的Bean
-
默认情况下
@Autowired具有强契约型,其所标注的参数或属性必须是可装配的,如果遇到不可装配的情况就会抛出令人厌烦的NoUniqueBeanDefinitionException异常。 -
如果属性不一定非要装配,null值也是可以接受的,这种情况下可以通过设置
@Autowired的required属性为false来配置自动装配是可选的。 -
@Autowired用在构造器装配时,如果有多个构造器,那么只能讲一个构造器的required设置为true其他构造器只能设为false,标注多个构造器时Spring会从满足装配条件的构造器中选择入参最多的构造器。 -
如果有多个Bean都完全满足装配条件可以使用
@Qualifier("beanName")限定器来指定想要装配的Bean。 -
使用
@Inject实现基于标准的自动装配@Inject是为了统一各种依赖注入框架的编程模型,JCP(Java Community Process)发布了依赖注入的规范,简称为JSR-330,更通常的叫法是 at inject。Spring 3开始已经兼容了该依赖注入模型。@Inject几乎可替代@Autowired,但是@Inject没有require属性,因此@Inject所标注的依赖关系必须存在,如果不存在就会抛出异常。
@Inject private Instrument instrument;- JSR-330还提供另一种技巧,注入一个Provider从Provider获取一个Bean
class Car { @Inject Car(Provider<Seat> seatProvider) { Seat driver = seatProvider.get(); Seat passenger = seatProvider.get(); ... } }- 限
@Inject所注入的属性,@Inject和@Autowired有许多共同点,@Inject中的@Named("beanName")就类似于@Autowired中的限定器@Qualifier("beanName")
-
在注解注入中使用表达式
- 存在场景我们想要直接属性注入字面值,Spring3.0引入了
@Value(""),例如:
@Value("让我们荡起双桨") private String song;- 装配简单的值并不是
@Value("")所擅长的,借助SpEL@Value变的更将的强大
@Value("#{systemProperties.myFavoriteSong}") private String song; - 存在场景我们想要直接属性注入字面值,Spring3.0引入了
-
自动检测Bean
- 当在Spring配置文件中增加了
<context:annotation-config/>时有助于完全消除<property>和<constructor-arg>元素,我们仍需要使用<bean>显式的定义Bean。 - 针对以上的问题Spring还有l另一种技术,
<context:component-scan/>除了完成与<context:annotation-config/>一样的工作外还允许Spring自动检测Bean和定义Bean。这意味着不使用<bean>元素,Spring中的大多数(或者所有)Bean能够实现定义和装配。
<?xml version="1.0" encoding="UTF-8" ?> <beans xmlns:xsi="http://www.w3.org/2001/XMLSchema-instance" xmlns:p="http://www.springframework.org/schema/p" xmlns:context="http://www.springframework.org/schema/context" xmlns:aop="http://www.springframework.org/schema/aop" xmlns:tx="http://www.springframework.org/schema/tx" xmlns="http://www.springframework.org/schema/beans" xsi:schemaLocation="http://www.springframework.org/schema/beans http://www.springframework.org/schema/beans/spring-beans-3.0.xsd http://www.springframework.org/schema/context http://www.springframework.org/schema/context/spring-context-3.0.xsd http://www.springframework.org/schema/tx http://www.springframework.org/schema/tx/spring-tx-3.0.xsd http://www.springframework.org/schema/aop http://www.springframework.org/schema/aop/spring-aop-3.0.xsd"> <context:annotation-config/> <context:component-scan base-package="com.air.tqb"> <context:exclude-filter type="annotation" expression="org.springframework.stereotype.Controller"/> </context:component-scan> </beans><context:component-scan>会扫描指的包及其子包,并且查找出能够注册为Spring Bean的类
- 当在Spring配置文件中增加了
-
<context:component-scan>又是怎么知道哪些类能注册为Spring Bean的类呢?- 默认情况下
<context:component-scan>查找使用g构造型(stereotype)注解所标注的类,这些注解如下:@Component:通用构造注解,标识该类为Spring组件@Controller:标识将该类定义为SpringMVC controller。@Repository:标识将该类定义为数据仓库@Service:标识将该类定义为服务- 使用
@Component标注的自定义的任意注解
- 默认情况下
-
过滤组件扫描
- 我们可以增加一个包含过滤器来要求
<context:component-scan>自动注册我们指定的包或类,例如:
<context:component-scan base-package="com.air.tqb"> <context:include-filter type="assignable" expression="com.air.tqb.Instrument"/> </context:component-scan>- 以上配置自动注册Instrument的实现类。
- 除了使用
include-filter来制定扫描哪些类,还可使用exclude-filter排除哪些类注册为Bean.
- 我们可以增加一个包含过滤器来要求
-
5中过滤器类型
- annotation:过滤器扫描指定注解标注的那些
- assignable:过滤器扫描派生与expression属性所指定类型的那些类
- aspectj:过滤器扫描与expression属性所指定的AspectJ表达式匹配的类
- custom:
- regx:过滤器扫描类名与expression属性所指地正则表达式所匹配的类
-
使用Spring基于基于Java的配置
- 为了满足那些不喜欢使用XML配置的开发人员,可以直接使用Java代码配置Bean
- 即使可以不使用XML就能编写Spring的大多数配置,但任然需要少量XML来启用Java配置加上注解
@Configuration,如下:
<?xml version="1.0" encoding="UTF-8" ?> <beans xmlns:xsi="http://www.w3.org/2001/XMLSchema-instance" xmlns:p="http://www.springframework.org/schema/p" xmlns:context="http://www.springframework.org/schema/context" xmlns:aop="http://www.springframework.org/schema/aop" xmlns:tx="http://www.springframework.org/schema/tx" xmlns="http://www.springframework.org/schema/beans" xsi:schemaLocation="http://www.springframework.org/schema/beans http://www.springframework.org/schema/beans/spring-beans-3.0.xsd http://www.springframework.org/schema/context http://www.springframework.org/schema/context/spring-context-3.0.xsd http://www.springframework.org/schema/tx http://www.springframework.org/schema/tx/spring-tx-3.0.xsd http://www.springframework.org/schema/aop http://www.springframework.org/schema/aop/spring-aop-3.0.xsd"> <context:annotation-config/> <context:component-scan base-package="com.air.tqb"> </context:component-scan> </beans>- 以上配置会告知Spring在com.air.tqb包内查找
@Configuration注解所标注的所有类
-
使用
@Configuration定义一个配置类- 使用
@Configuration注解的类就相当于XML配置文件中的<beans>标签
@Configuration public class SpringConfiguration { }-
声明一个简单的Bean
@Configuration public class SpringConfiguration { @Bean public Instrument piano(){ return new Piano(); } } -
以上代码在Spring应用上下文注册了一个ID为
pianoBean
- 使用
本文由 zealzhangz 创作,采用 知识共享署名4.0 国际许可协议进行许可
本站文章除注明转载/出处外,均为本站原创或翻译,转载前请务必署名
最后编辑时间为:
2018/07/07 18:57

